Unit of Measure

Specifications

Bore

N/A Open 3 1/4"

Unloader Type

N/A E=3 Step Internal Unloader F=3 Step External Unloader G=2 Step Internal Unloader H=2 Step Externall Unloader

Catalog Number

N/A CVC01

Coupling Alignment

N/A

COUPLING ALIGNMENT

GENERAL INSTRUCTIONS
  1. Disassemble coupling. Note arrangement of bolts, washers (forged , links), and-nuts as they must be replaced In the some order. Tie a string or wire through one bolt hole of each laminated ring to retain the dialed position of Individual discs.
  2. Inspect both driving and driven shafts and flanges, making sure they ore free from burrs. Be sure the keys fit the shafts and flanges properly.
  3. Mount flanges on shafts. they do not go on by light topping with a soft lead hammer, they should be heated in oil and quickly positioned on the shafts.
  4. Bring equipment into position, making sure the distance between flanges Is equal to the "C" dimension in the table.
  5. Reassemble coupling. Use sectional view on page 21 for reference.
Align this coupling carefully. The boner the initial alignment, the more capacity the coupling has to take core of s sub sequent operational misalignment.

DIAL INDICATOR METHOD
INDICATOR MOUNTING TO BE WORKED OUT TO SUIT CONDITIONS AT HAND
  1. TO CHECK ANGULAR MISALIGNMENT (figure 2) mount Indicator (as shown on flange) on compressor side of coupling with stem on face of right flange ROTATE EQUIPMENT noting maximum and minimum indicator reading. Move equipment as necessary to reduce the total indicator reading to .002" or less for each inch of diameter at the indicator stem.
  2. TO CHECK PARALLEL MISALIGNMENT (figure 3) set indicator stem on outer surface of flange. Rotate equipment noting maximum and minimum indicator reading. Move equipment as necessary to reduce indicator reading to .902" or less for each inch of diameter at indicator stem, taking care not to disturb the setting of Step 1. 3. Repeat steps I and 2 as necessary. 4. This coupling should be rotated several revolutions to make sure no "endwise creep' in connected shafts is measured. 5. Tighten all bolts to 25 ft/lbs. for 5/16" bolts or 43 ft/lbs for 3/8" bolts. After several hours of operation recheck tightness of bolts.
NOTE: It has been found that a magnetic base such as the Tiny-Titan mode by Enco Manufacturing Company to fit on grooved or straight surfaces used with a dial indicator 0-30 thousandths, plus or works out very well for various coupling sizes.


INSTRUCTIONS:
  1. Prepare sparate sheet for each complete coupling aligned.
  2. Check squares to indicate components being aligned.
  3. Scribe motor shaft in resting position then run motor and observe the thrust clearance in the compressor.
  4. After complete alignment: when setting in center member check clearance with a feeler gouge making sure the ending clearance is within one to two thousandths. Caution: make sure when bolting coupling you are not pulling on compressor shaft.
  5. Maintain this sheet With your warranty papers.

Evacuation Procedure

N/A

 
System Cleanliness
 
System cleanliness is one of the most important factors that affect system and compressor reliability. System contamination can cause both mechanical and electrical failures. There are several sources ofsystem contamination. Some of these are:
  1. Copper oxides from system refrigerant piping brazing.
  2. Refrigerant piping chips and burrs and brazing flux.
  3. Processing residue and metal chips from evaporators and condensers.
  4. Metal chips and wire brush strands from processing of other system components.
  5. Contamination in refrigeration tubing which is left uncapped during assembly.
  6. Moisture and air.
    In addition, field erected systems are subject to all the dirt and system contamination of the typical jobsite. It is recommended that a suction line filter be installed in the system to prevent contaminants form entering the compressor ;


Evacuation and Dehydration
 
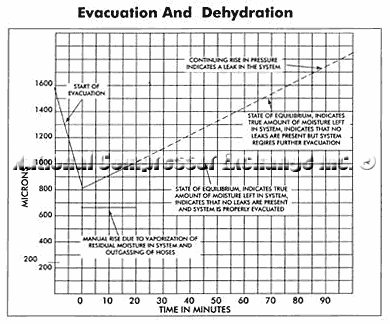
For the refrigeration system to work property, it must be free of air and moisture. The process by which air and moisture are removed is known as evacuation and dehydration. Moisture and air are harmful to the system because they increase the condensing temperature, raise the discharge gas temperature, cause oil breakdown and the formation of acids. Acids are corrosive to the components in the refrigeration system, including the piping, refrigerant specialties, and the which can cause mechanical failure of the compressor.

The recommended method for evacuation and dehydration is to evacuate the system from both the gigh and low sides to 800 microns or less. To establish that the unit is leakfree and moisture-free, a standing vacuum test is recommended. The maximum allowable rise over a 15 minute period is 200 microns. If the Hse exceeds this, either there is still moisture in teh system or a leak is present in the system See Chart 1.

CAUTION
NEVER USE OXYGEN OR ACETYLENE IN PLACE OF REFRIGERANT AND DRY NITROGEN FOR LEAK TESTING. A VIOLENT EXPLOSION MAY RESULT, CAUSING PERSONAL INJURY OR DEATH.

ALWAYS USE A PRESSURE REGULATOR WHEN USING NITROGEN TO PRESSURE TEST. FAILURE TO DO SO WILL RESULT IN EXTREMELY HIGH PRESSURE WHICH COULD EXCEED THE BURST PRESSURE OF TEH COMPRESSOR OR OTHER SYSTEM COMPONENTS AND RESULT IN PERSONAL INJURY OR DEATH.

FOR SHELF STORAGE EVAC. TO 250 MICRONS